帮助文档
单点登录
您可以通过NTLM或SAML身份验证设置对AD360的单点登录以及与之集成的产品。
NTLM 认证
要启用基于ntlm的单点登录,请执行以下步骤:
- 导航至 管理 → 管理 → 登录设置
- 选中 启用单点登录
- 从选择组件 下拉框中选择希望启用单点登录的产品
注意: 只有支持单点登录的产品才会显示出来。 - 从“选择域”下拉框中选择域。这些域中包含了用户访问AD360及组件的用户帐户。
- 点击 保存设置
- 点击开始services.msc.
- 找到Manageengine AD360服务。
- 右键单击该服务,然后选择“属性”,再选择“登录”。
- 选择此帐户并提供凭据。
注意:
如果将AD360作为服务安装,请按照以下步骤为管理员配置服务帐户的权限。
修改现有的单点登录设置,
- 导航到管理→管理界面→登录设置。
- 点击 [
 ] 状态列中您要修改设置的图标。
 - 点击电脑名称 和密码在各个字段中。
- 点击“在域中创建此计算机帐户”复选框,使用输入的凭据创建计算机(如果域中尚不存在此凭据)。
- 单击高级。如果在输入计算机名称和密码后没有自动填写DNS服务器和DNS站点,请手动输入。
- 点击保存。
标识DNS服务器IP地址:
- 从属于您选择的域的计算机中打开命令提示符。
- 输入ipconfig/all并按Enter。
- 使用DNS服务器下显示的第一个IP地址。
标识DNS站点:
- Open Active Directory Sites and Services in Active Directory.
- Expand the Sites and identify the Site in which the Domain Controller configured under the selected domain appear.
- Use the Site name for DNS Site.
Troubleshooting steps for NTLM-based SSO:
I. Change browser settings to allow Single Sign-On
Trusted sites are the sites with which NTLM authentication can occur seamlessly. If SSO has failed, then the most probable cause is that the AD360 or its integrated component’s URL isn't a part of your browser's trusted sites. Please add the URLs of AD360 and the selected components in the trusted sites list. Follow the steps given below:
- Internet Explorer
- Google Chrome
- Mozilla Firefox
- It is recommended that you close all browser sessions after adding the URL to the trusted sites list for the changes to take effect.
- Google Chrome and Internet Explorer use the same internet settings. Changing the settings either in Internet Explorer or in Chrome will enable NTLM SSO in both browsers. It is again recommended to close both the browser sessions for the changes to be enabled.
Note:
Internet Explorer:
- Open Internet Explorer and click the Tools button.
- Click Internet options.
- In the Internet options dialog box that opens, click the Security tab.
- Under Select a zone to view or change security settings box, select Local Intranet.
- Now click the Sites button.
- If you are using IE 11, click on the advanced button and add the URLs of AD360 and the components to the list of intranet site.
- If you are using versions lower than IE 11, add the URLs of AD360 and the components to the list of intranet sites.
- Click Close, and then click OK.
- Close all browser sessions and reopen the browser.
Google Chrome
- Open Chrome and click the Customize and control Google Chrome icon (3 horizontal lines icon on the far right of the Address bar).
- Click Settings, scroll to the bottom and click the Show advanced settings link.
- Under the System section click Open proxy settings.
- In the Internet Properties dialog box that opens, navigate to the Security tab → Local Intranet, and then click Sites.
- Click Advanced and add the URLs of AD360 and the components to the list of intranet sites.
- Click Close, and then OK.
- Close all browser sessions and reopen the browser.
Mozilla Firefox
- Open Firefox web browser and type about:config in the address bar.
- Click I accept the risk in the warning window.
- In the Search field, type: network.automatic-ntlm-auth.trusted-uris.
- Double-click the network.automatic-ntlm-auth.trusted-uris preference and type the URL of AD360 and the integrated products in the prompt box. Use a comma to separate multiple URLs.
- Click OK to save the changes.
- Close all browser sessions and reopen the browser.
II. Check the computer account configuration
Status: Error in Creating Computer Account

This error can be due to any of the reasons listed below:
- Invalid domain credentials in AD360
- Log into the AD360 web-console with admin credentials.
- Navigate to the required component using the Apps Pane or the Jump to link.
- Click on domain settings and update the domain credentials (i.e., username and password).
- Synchronize the updated domain credentials with AD360 by navigating to AD360 → Admin tab and clicking on the Sync now button.
- Domain controllers are not accessible from AD360
- Log into AD360 web-console with admin credentials.
- Navigate to the required component through the Apps Pane or the Jump to link.
- Click domain settings and specify the name of the relevant DC, and also the credentials of the account that the AD360 should use.
- Synchronize the updated domain controller with AD360 by navigating to AD360 → Admin tab and clicking on the Sync now button.
- Non-conformance to password policy
- Click the error message Error in creating a new computer account in the status column against the domain in which you wish to create a computer account.
- Create a computer account manually by entering Computer Name and Password.
This could happen when the credentials of the user account specified in the domain settings section of the integrated products have expired. To update the credentials and synchronize it with AD360, follow these steps:
When AD360 cannot reach the specified domain controllers (DCs), you must add another DC that it can access.
When the password of the automatically created computer accounts for NTLM authentication does not meet the domain password policy settings, this error occurs. To resolve this issue, you need to create a computer account manually, and assign it a password that meets the complexity requirements of the domain policy settings. To accomplish this, follow the steps given below:
SAML authentication
You can set up single sign-on to access AD360 and the integrated products through any of these popular identity providers.
IMPORTANT: SAML-based SSO cannot be enabled if Reverse Proxy is also enabled.
Configuring single sign-on to AD360 using Okta
Step 1: Configure AD360 in Okta
- Log in to the Okta portal.
- Under the Apps tab, click Add Application and select Create New App.
- Select Platform as Web and choose Sign on method as SAML 2.0 and click Create.
- In General Settings, enter the SAML application name, say AD360, in the App name field. Upload a logo for the application if needed, then click Next.
- In the Configure SAML section, enter the values for,
- Single sign on URL
- Audience URI
- Leave the other settings as it is.
- Click Finish.
- Once the configuration is complete, navigate to the Sign on tab to download the Identity Provider metadata file.
The values for these two fields can be obtained from AD360 → Admin → Administration → Logon Settings → Single Sign-On → SAML Authentication → Identity Provider (IdP) → Okta. Copy the ACS/Recipient URL value and paste it in the Single sign on URL field. Copy the Entity ID value and paste it in the Audience URI field.
Step 2: Configure Okta in AD360
- Log in to AD360 as an administrator.
- Navigate to Admin → Administration → Logon Settings → Single Sign-On → SAML Authentication.
- Select Okta from the Identity Provider (IdP) drop-down.
- For SAML Configuration Mode option, select Upload Metadata File.
- Click Browse and upload the metadata file obtained in Step 1 (8).
- If you want to enable Single Logout,
- Copy the Issuer URL, SP Logout URL and download the X.509 Certificate in AD360.
- In Okta, go to the Configure SAML page, and click Show Advanced Settings.
- Check the Enable Single Logout option.
- Paste the Issuer URL value in SP Issuer field and the SP Logout URL value in Single Logout URL field.
- Click the Browse button next to Signature Certificate and select the X.509 Certificate you downloaded from AD360. Click Upload Certificate.
- Click Save to complete the configuration.
Configuring single sign-on to AD360 using OneLogin
Step 1: Configure AD360 in OneLogin
- Log in to the OneLogin portal.
- Click Apps tab and select Add Apps.
- Click SAML Test Connector (IdP) in the apps category.
- Enter the Display Name and upload the icon for the application. Click Save.
- Under Configuration tab, enter the values for ACS (Consumer) URL Validator and ACS (Consumer) URL.
- Click More Actions in the top panel and click SAML Metadata to download the metadata file.
- Click Save to complete the configuration in Onelogin.
The values for these two fields can be obtained from AD360 → Admin → Administration → Logon Settings → Single Sign-On → SAML Authentication → Identity Provider (IdP) → OneLogin. Copy the ACS/Recipient URL value and paste it in these two fields.
Step 2: Configure OneLogin in AD360
- Log in to AD360 as an admin.
- Navigate to Admin → Administration → Logon Settings → Single Sign-On → SAML Authentication.
- Select OneLogin from the Identity Provider (IdP) drop-down.
- For SAML Configuration Mode option, select Upload Metadata File.
- Click Browse and upload the metadata file obtained in Step 1 (6).
- If you want to enable Single Logout, copy the SP Logout URL in AD360 and paste it in the Single Logout URL field in OneLogin’s Configuration page.
- Click Save to complete the configuration.
Configuring single sign-on to AD360 using Ping Identity
Step 1: Configure AD360 in Ping Identity
- Log in to the Ping Identity portal.
- Click Applications → My Applications → SAML → Add Application → New SAML Application.
- On the Application Details page, enter Application Name, Application Description and Category. You can optionally assign an application icon.
- Click Continue to Next Step.
- On the Application Configuration page, provide the ACS URL and Entity ID.
- In the next step, click Save & Publish.
- Once the configuration is complete, the metadata file can be downloaded.
The values for these two fields can be obtained from AD360 → Admin → Administration → Logon Settings → Single Sign-On → SAML Authentication → Identity Provider (IdP) → Ping Identity. Copy the ACS/Recipient URL value and paste it in the ACS URL field. Copy the Entity ID value and paste it in the Entity ID field.
Step 2: Configure Ping Identity in AD360
- Log in to AD360 as an admin.
- Navigate to Admin → Administration → Logon Settings → Single Sign-On → SAML Authentication.
- Select OneLogin from the Identity Provider (IdP) drop-down.
- For SAML Configuration Mode option, select Upload Metadata File.
- Click Browse and upload the metadata file obtained in Step 1 (7).
- If you want to enable Single Logout,
- Copy the SP Logout URL in AD360 and paste it in the Single Logout Endpoint field in Ping Identity’s SAML Applicationpage.
- Download the X.509 Certificate in AD360. In Ping Identity’s SAML Application page, click the Browse button next to Primary Verification Certificate and upload the downloaded certificate.
- Click Save to complete the configuration.
Configuring single sign-on to AD360 using ADFS
Step 1: Configure AD360 in ADFS
Prerequisites:
To configure ADFS for identity verification in AD360, you need the following components:
- You need to install the ADFS server. The detailed steps for installing and configuring ADFS can be found in this Microsoft article.
- An SSL certificate to sign your ADFS login page and the fingerprint for that certificate.
Configuration steps
Note: Only Forms Authentication method is configured for users trying to access AD360 through ADFS authentication. You can view this setting in Authentication Policies → Primary Authentication → Global Settings.
Claim Rules and Relying Party Trust
During configuration, you will need to add a Relying Party Trust and create claim rules. A Relying Party Trust is created to establish the connection between two applications for authentication purposes by verifying claims. In this case, ADFS will trust the relying party (AD360) and authenticate users based on the claims generated. Claims are generated from claim rules by applying certain conditions on them. A claim is an attribute that is used for identifying an entity, to establish access. For example, the Active Directory sAMAccountName.
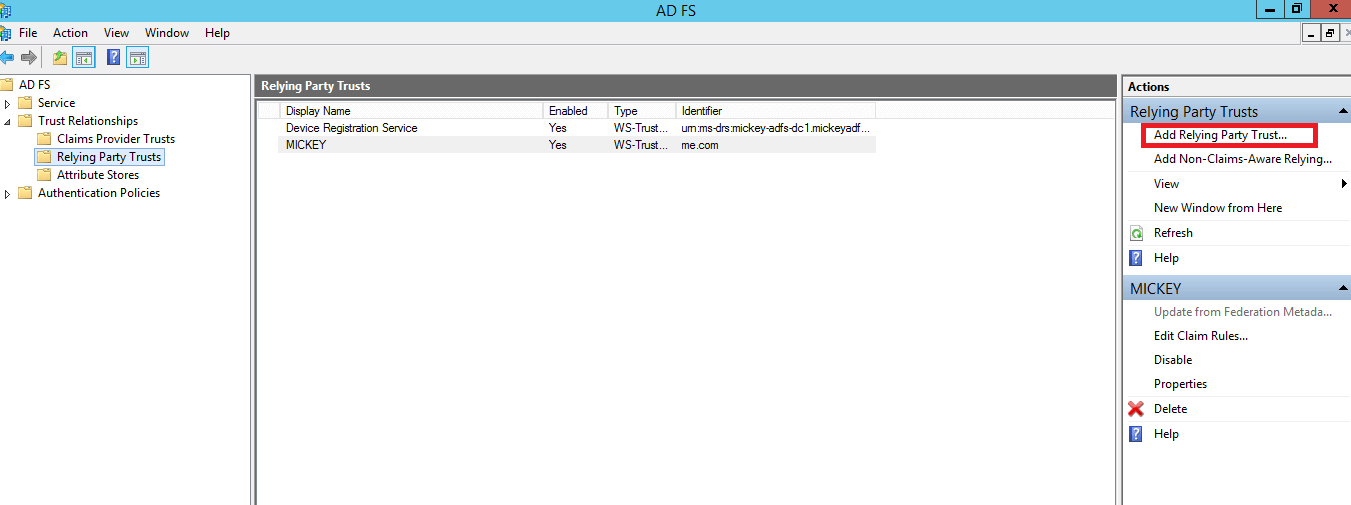
- Open the AD FS Management console.
- The connection between ADFS and AD360 is created using a Relying Party Trust (RPT). Select the Relying Party Trusts folder from AD FS.
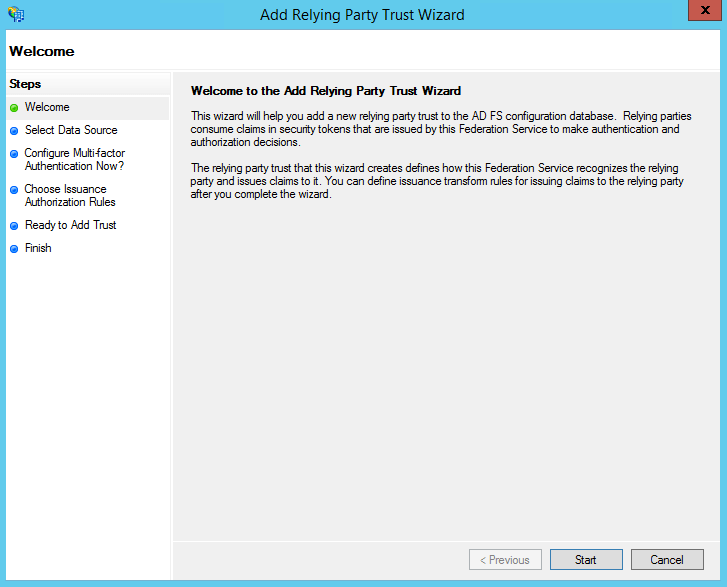
- From the Actions sidebar, select Add Relying Party Trust. The Add Relying Party Trust Wizard opens.
- Click Start.
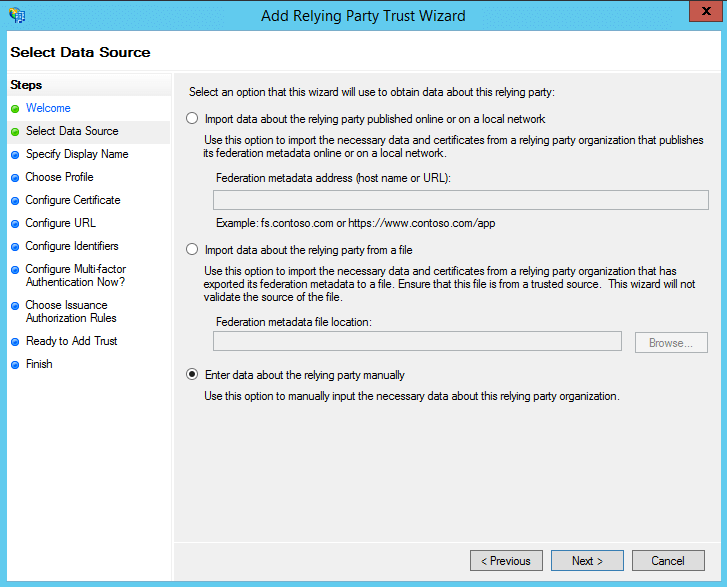
- In the Select Data Source page, click on the Enter Data About the Party Manually option and click Next.
- In the Specify Display Name page, enter a Display name of your choice and also add additional notes if required. Click Next.
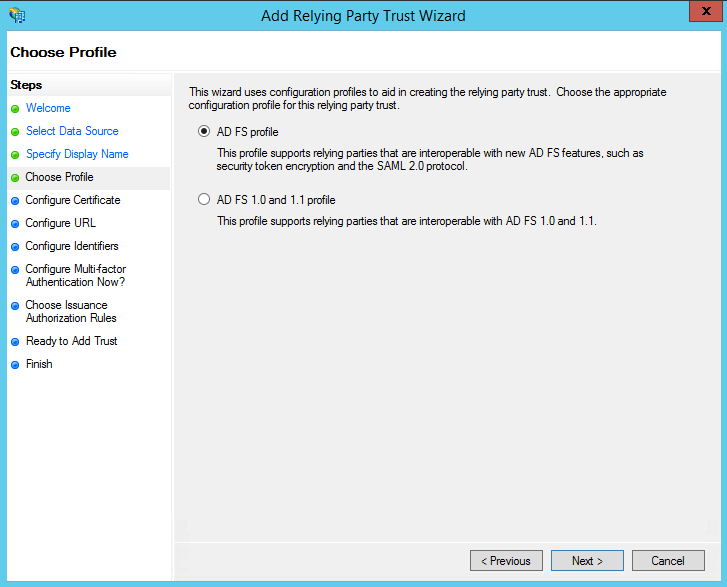
- In the Choose Profile page, select the AD FS profile option. Click Next.
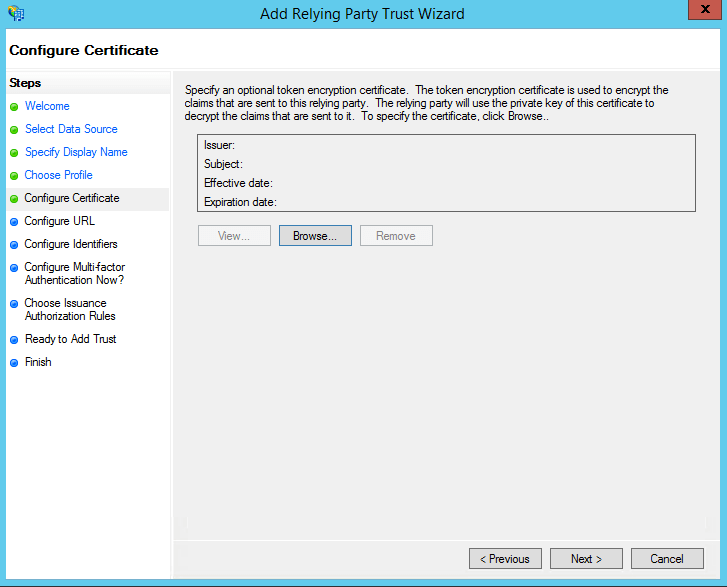
- On the Configure Certificate screen, the default settings have already been applied. Click Next.
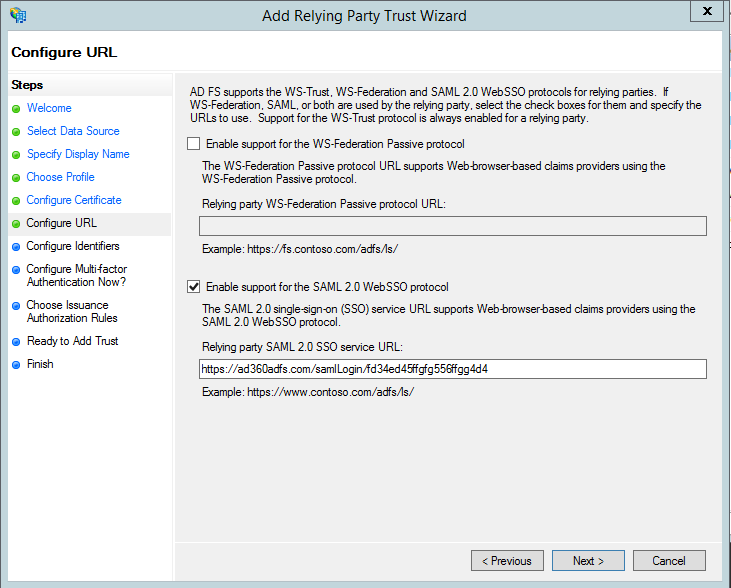
- On the Configure URL screen, check the box labeled Enable Support for the SAML 2.0 WebSSO protocol. The Relying party SAML 2.0 SSO service URL will be the ACS URL of AD360. Note that there is no trailing slash at the end of the URL. For example:
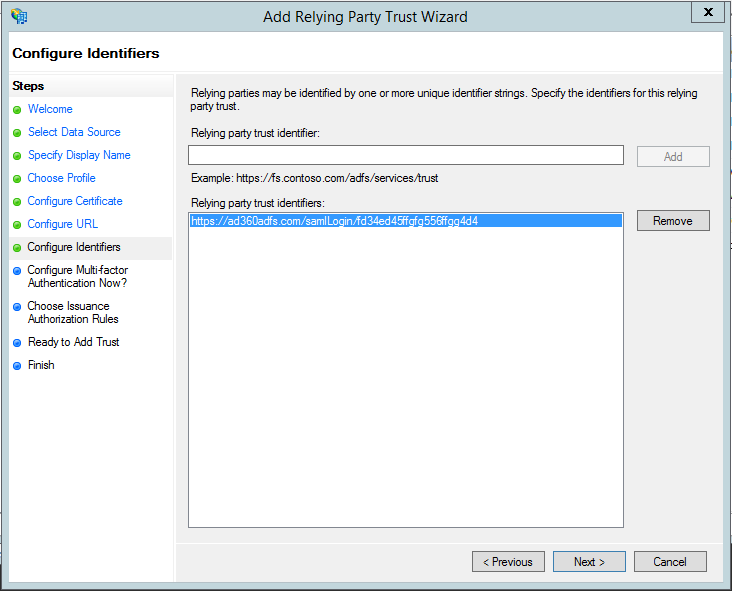
- In the next page, in the Relying party trust identifiers field, copy and paste the Entity ID value.
- On the next page, you can choose to configure multi-factor authentication settings for the relying party trust. Click Next.
- In the Choose Issuance Authorization Rules page, you can choose to either Permit all users to access this relying party. Click Next.
- The next two pages will display an overview of the settings you have configured.
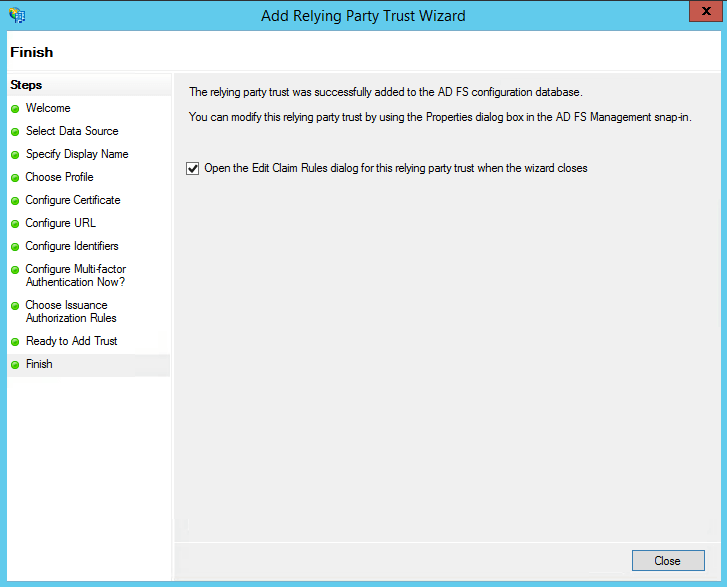
- In the Finish page, click Close to exit the wizard. Keep the Open the Edit Claim Rules dialog for this relying party trust when the wizard closes option selected to open the Claim Rules editor automatically.
- Once you have configured the Relying Party Trust, you can create the claim rules using the Claim Rules Editor.
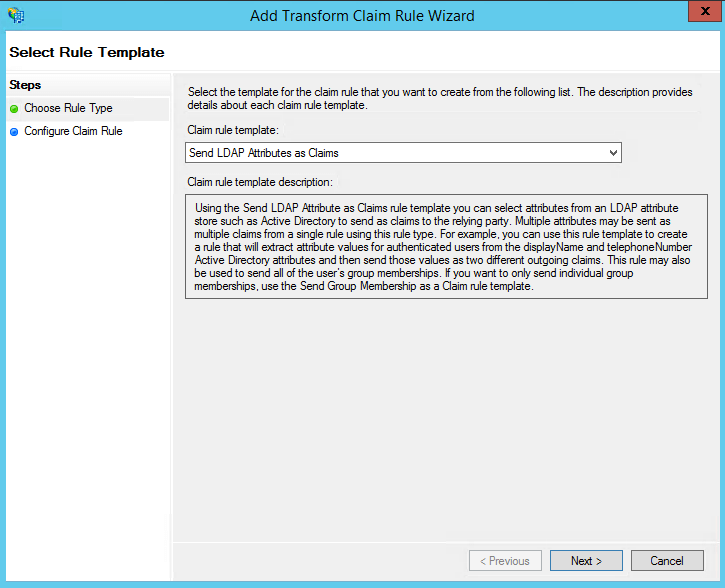
- In the Issuance Transform Rules tab, click Add Rule.
- From the Claim rule template drop-down, select Send LDAP Attributes as Claims. Click Next.
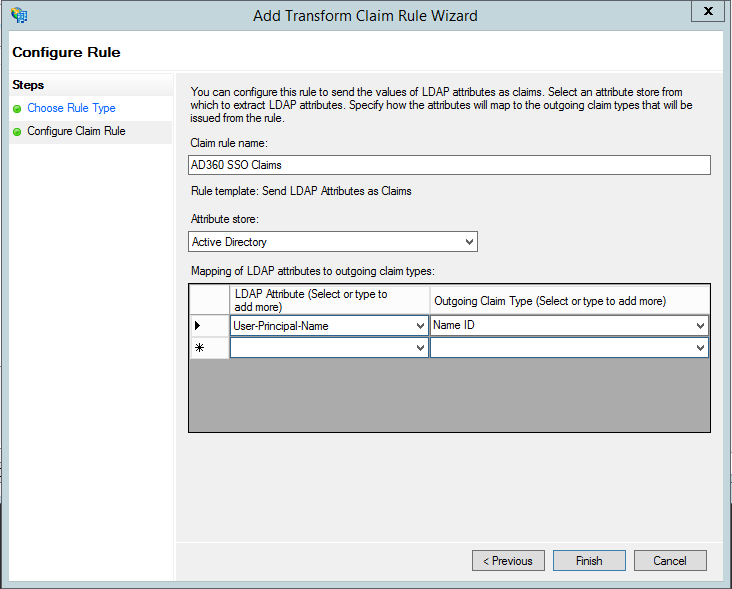
- In the next page, provide a Claim rule name and select Active Directory from the Attribute store drop-down.
- In the LDAP Attribute column, select userPrincipalName.
- In the Outgoing Claim Type column, select Name ID.
- Click Finish to save the rule.
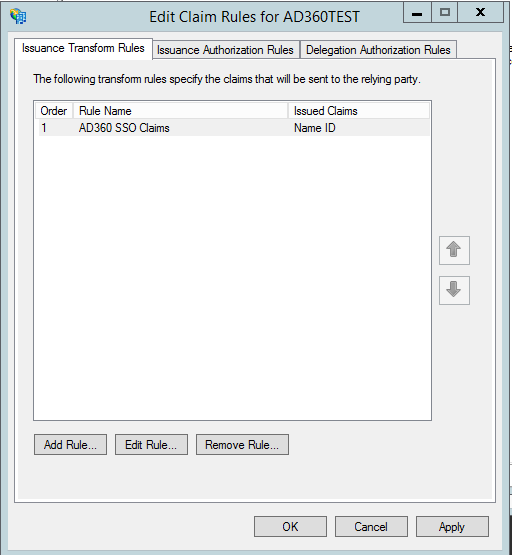
- Once you click Finish, you can view the rule that has been created.
- After completing the ADFS configuration, download the metadata file by clicking on the Identity Provider metadata link. For example:
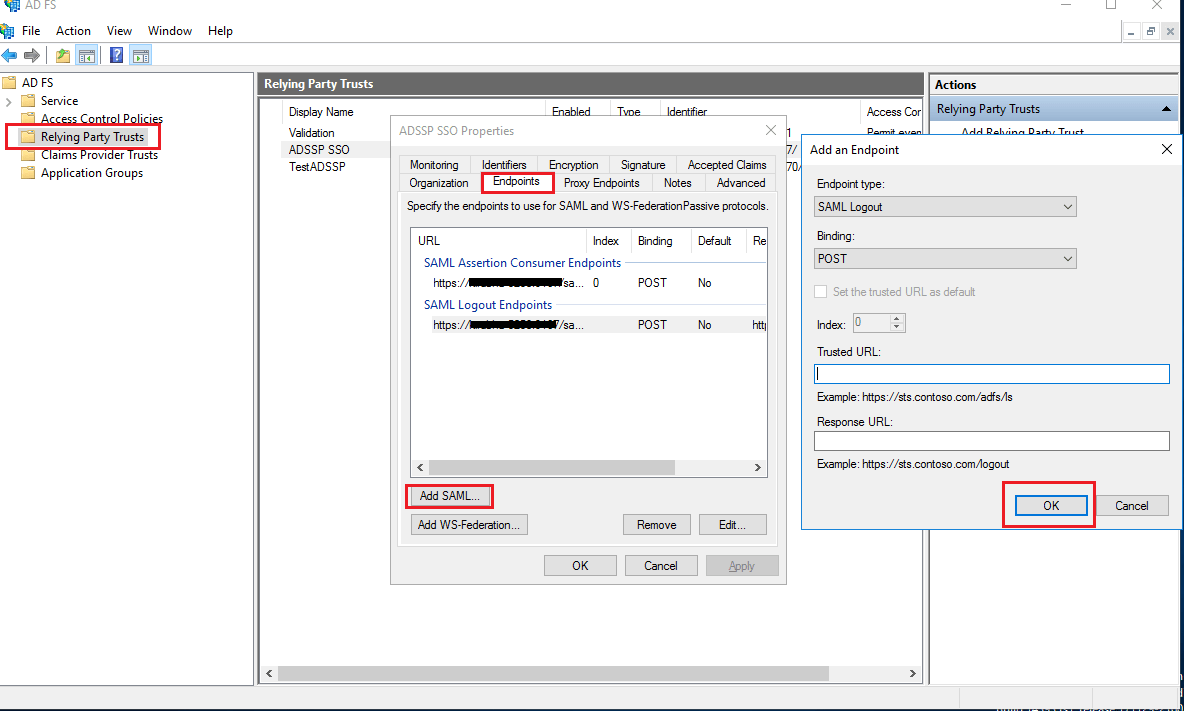
https://<server_name>/FederationMetadata/2007-06/FederationMetadata.xml. - Navigate to the Relaying Party Trusts and find the rule you've created.
- Right-click on the rule and click Properties.
- In the window which opens, find the Endpoints tab and click Add SAML button.
- In the Trusted URL, paste the SP Logout URL.
- In the Signature tab, upload the X.509 Certificate.
- Click OK.

https://ad360-server/samlLogin/955060d15d6bb8166c13b8b6e10144e5f755c953
Note: To get the ACS URL value, navigate to AD360 → Admin → Administration → Logon Settings → Single Sign-On → SAML Authentication → Identity Provider (IdP) → ADFS. Copy the ACS URL/Recipient URL value.
Note: To get the Entity ID value, navigate to AD360 → Admin → Administration → Logon Settings → Single Sign-On → SAML Authentication → Identity Provider (IdP) → ADFS. Copy the Entity ID value.
Note: Replace <server_name> with the AD FS Server hostname.
You will need this file while configuring SAML authentication in AD360. So, save this file and keep it safe.
Note: To get the SP Logout URL, navigate to AD360 → Admin → Administration → Logon Settings → Single Sign-On → SAML Authentication → Identity Provider (IdP) → ADFS. Copy the SP Logout URL value.
Note: To get the X.509 Certificate, navigate to AD360 → Admin → Administration → Logon Settings → Single Sign-On → SAML Authentication → Identity Provider (IdP) → ADFS. Click Download X.509 Certificate link to download the certificate file.
Step 2: Configure AD FS in AD360
Prerequisites :
Enable RelayState in ADFS.
- For Windows Server 2012:
- Navigate to the %systemroot%\ADFS\Microsoft.IdentityServer.Servicehost.exe.config file in your ADFS server.
- In the <microsoft.identityServer.web> section, enter the following code: <useRelayStateForIdpInitiatedSignOn enabled="true" />
Sample code:
<microsoft.identityServer.web>
…..
<useRelayStateForIdpInitiatedSignOn enabled="true" />
</microsoft.identityServer.web> - Restart the ADFS server.
- For Windows Server 2016:
- Open Powershell with administrative properties in your ADFS server.
- Run the following command to enable IdP-initiated SSO:
Set-ADFSProperties -EnableIdPInitiatedSignonPage $true - Run the following code to enable RelayState:
Set-ADFSProperties -EnableRelayStateForIDPInitiatedSignon $true - Restart the ADFS server.
- Log in to AD360 as an admin.
- Navigate to Admin → Administration → Logon Settings → Single Sign-On → SAML Authentication.
- Select ADFS from the Identity Provider (IdP) drop-down.
- Click Browse and upload the metadata file you downloaded from Step 1 (23).
- Click Save.
Accessing AD360 through ADFS
- To access AD360, use the URL provided below:
https:// <ADFSserver>/adfs/ls/idpinitiatedsignon.aspx - Select AD360 from the list of applications.
Where, ADFSserver is the server in which the ADFS is deployed.
Configuring single sign-on to AD360 using custom identity provider
You can configure any custom identity provider of your choice to enable single sign-on to access AD360 and the integrated products. To do so, configure AD360 settings in the preferred identity provider by following the steps explained above.
Configure custom identity provider in AD360
- Log in to AD360 as an admin.
- Navigate to Admin → Administration → Logon Settings → Single Sign-On → SAML Authentication.
- Select Custom Identity Provider from the drop down list.
- Upload the metadata file of the custom identity provider.
- Click Save to complete the configuration.
Troubleshooting tips for SAML-based SSO
Error: Unable to connect. Sorry. The requested page could not be loaded. Some possible reasons could be:
- Direct access to the URL is restricted.
- The product is being accessed from multiple tabs. Try Again.
Solution: If you get the above error message, please re-enter the ACS/Recipient URL in the IdP and try again.